The streets are always there for us

I’m back from Stockholm alive and with no intentions to disappear from the blogosphere (as the trend might be at the moment). The discounts were unbelievable and I have literally 6 huge bags stuffed with new clothes! Almost everything was -75 % off so you can imagine how crazy it was. I think I went a little too deep into the discount craze but at least I now have new clothes and shoes for next year (well, at least until the next discount season). I mainly went for the Swedish fashion and the color black made a return to my closet for this fall. I will introduce more of my findings in later posts.


While in Stockholm and shopping, we went to see Europride 2008. Last year it was just Stockholm Pride but this year all of Europe was celebrating in Stockholm. I wore one of my purchases, cropped grandpa pants with a paper bag waist. I had them on pretty much every day after getting them, that’s how comfortable they are.


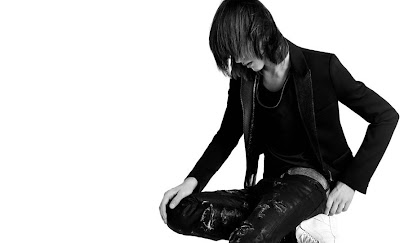
Shirt: Fifth Avenue Shoe Repair
Pants: Monki
Shoes: Skopunkten
Bag: Saddler


As for the trends in Stockholm, a lot of girls wore really skimpy dresses that were a bit too short for my taste. Also huge shirts with rolled sleeves and without any tights or leggings were a big hit. Everyone was super tanned and so summery. I also made an observation that all the cool hipster kids tend to like good music, as the club Debaser was full of them on Saturday night. In fact, it must be one of the best indie clubs I have ever been in. Unfortunately I was not able to take my camera in my purse, so there are no shots of the party outfit, sorry.After this mini holiday its time to get back to work, although it seems that while I was gone my work laptop crashed. I hope that all the precious photos that I had on it are not gone with the wind…

P.S. Awhile back I was asked by the Fashion Spot community to give a little interview about my style and provide some outfit pics for the “What are you wearing today” section. I took me like two months to actually act on the request and now the interview is finally up. I, amongst likes of Susie Bubble and Rumi, have done this, so I truly appreciate this opportunity. You can find the interview and pics here.

Saved by the bell

Yesterday I went to a costume party called Roska (translation is “Trash”). The dress code was 80’s and 90’s, and as a huge costume party fan, I decided to wear 90’s gear from head to toe. Kelly from the American TV-show Saved by the Bell was my muse for the outfit. She always wore those tiny tops with mom jeans and had a huge wave in her hair.


I purchased the shirt a few years ago at H&M in Stockholm in the vintage section. At the time I was thinking that belly shirts will definitely come back in fashion some time soon. From what I’ve seen on runways lately, in fact, like it or not, they are coming back big time. I also bought a pair of second hand Levi’s and made a scrunchie out of some excess fabric that I had. The earrings are my mother’s and from the 90’s, and the shoes I got from a friend long time ago. The party itself was not all that great because most of the people just bought some neon shirt from H&M thinking they’re all that. I wish people would put more effort into costume parties.. 

And oh yes, I am doing funny poses just like they did in the 90’s. Can you see the resemblance between mine and Kelly’s look?


Shirt: Vintage
Jeans: Levi’s, second hand
Shoes & belt: Second hand
Wayfers: Glitter
Jewelery: Mom’s old

Greetings from the land of fjords!

I’m back from the wonderful trip to Norway. The scenery is really amazing and the city of Tromso is so pretty! Most of the clothes I wore on the trip were just comfortable travel clothes and since it was really cold up there, I wore my trench coat everywhere I went. I’d rather post only scenery pictures but since this is a fashion blog, I’ll post the outfits that I wore. If only the weather would have been a bit warmer, I would have had so much more to offer.


We also visited my family’s cabin which is located in Rovaniemi (a small city in northern Finland), and believe it or not, I actually managed to do a little shopping there. I will introduce my new shoes in a later blog entry. Next week I’m going to Stockholm, so more decent outfits and shopping to come for sure…

DIY Waxed jeans

Waxed/black coated jeans have been around for awhile, for example Acne and Dior Homme have made their own version of these jeans. I never owned a pair due to the fact that the price was ridiculously high and none of the waxed jeans fit me. My boyfriend on the other hand has had two pairs of Acne Hex Cash black coated jeans, and even though he hasn’t ever washed them in a washing machine, the top coat has already totally worn out. I have always wondered how on earth they do that cool wax/black coat surface, so I really wanted to get into the bottom of this mystery. My boyfriend and I figured out that the paint Acne may use is acrylic paint, so we walked into the artist shop that was around the corner and did some shopping. What we found was black acrylic paint and some gloss to mix in with the paint. So, we took the stuff home and started painting the jeans with the mix and were pretty pleased with the outcome.
Here are detailed instructions on how to make your own waxed jeans, how much it costs, and what you will need. I will also reveal the results of this denim makeover (see the pictures). I chose to give the makeover to some old Cheap Mondays and my boyfriend did it to his worn out Acne’s.

1. The jeans – Since the paint dries out really hard you should use jeans that have lost their form or are a size or two bigger than usual. Otherwise you may not fit in your jeans after the makeover.

2. The Paint – Get black (or whatever color) acrylic paint, a brush that’s made for acrylic paint and if you want to add more shine to the look, get some soft gel gloss to mix in. You will also need a cup where you mix the paint and probably some cardboard to protect your floor. Art stores sell these supplies and are willing to help, just ask them. There are cheap and expensive paint options, depends how much you’re willing to spend on your project. The black paint we purchased is called Wilson & Newton: Galleria Acrylic paint, 13€. The gloss was by Golden and it is called Gel Medium Soft Gel (Gloss), 10.70€. These were huge bottles, so we could do this operation about 10 times if we wanted to.

3. Mixing the paint – Mix about 80% acrylic paint and 20% of the gloss. If you want more shiny look, add more gloss. If you want to thin then paint, add water.

4. The Paint job – Place your jeans on the floor on top the protective cardboard (or plastic). Start painting the jeans with the paint brush. Use mild strokes along the lines of the denim. You can do as many layers as you want, if you feel that the jeans didn’t get the result you wanted. My boyfriend did two layers, I did just one because I wanted a bit more rougher look. Acrylic paint dries really quickly, so you can do both sides in about one hour. After finishing both sides, let the jeans dry a few hours before trying them on, just to be sure.

My boyfriend working on his jeans.
5. Ta dah! – Now you got yourself some waxed jeans. Pullinging them on is like putting on jeans made out of paper, so be patient and careful. With heavy use the jeans will soften up and get more comfortable, trust me on this one.

6. Washing instructions – I don’t recommend that you wash your jeans but if you absolutely must, do it in cold water without any soap. I’m warning you though, the color will bleed! If you can, take the jeans to a dry cleaner.

7. Wear your jeans – There you got yourself a cool new pair of waxed jeans. Go on and wear them!


Top: Poco Loco
Hooded vest: Two Percent 2%
Jeans: Cheap Monday, DYI wax coat
Shoes: Bullboxer